How to set up a test Email Relay for testing email in Salesforce
Introduction
Developing software on Salesforce often results in email flows being triggered as new events happen in your application. When you're developing your application you don't want to be sending real emails.
Salesforce allows you to set up an email relay for sending email through your own SMTP server. Setting up Imitate Email as your SMTP server is very easy to do:
Step 1: Set up Imitate Email
If you've not already done so please sign up to Imitate Email.
Step 2: Locate your mailbox credentials
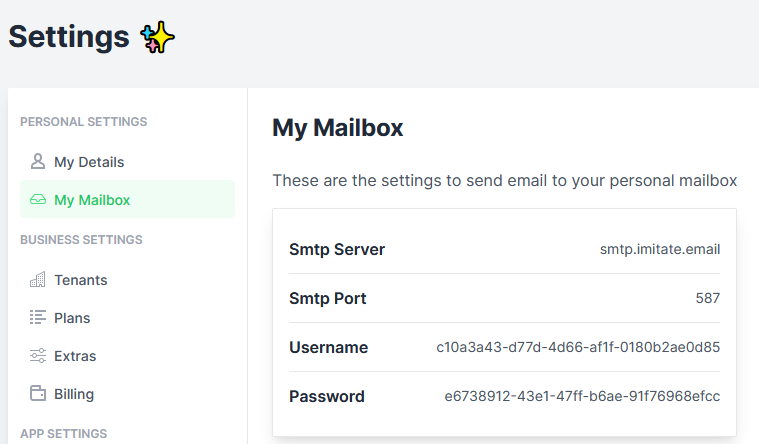
Your username
To locate your username go to Settings > My Mailbox where you will find it (it is the same for all mailboxes in your account)
For the password
If you're on the Free or Developer plan or you're setting this up for your personal mailbox copy the password from the same place as the username.
If you're setting this up for a team mailbox go to Settings > Projects and you will find the password next to the symbol for your mailbox. It will look like the following 6bcb69b2-08ac-4c67-911a-10442f7d84b3
Step 3: Set up Email Relay on Salesforce
From Setup, type "Email Relays" in the Quick Find box and select Email Relays.
Select Create Email Relay.
Enter:
smtp.imitate.emailin the Host box587in the Port boxRequired Verifyfor the TLS Settings- Ensure Enable SMTP Auth is selected
- Select
Auth Plainfor the Auth Type - Copy your username and password from the previous step in to correct boxes
Save the page
Set up an Email Domain Filter for the Email Relay
- From Setup, in the Quick Find box, enter Email Domain Filters, and then select Email Domain Filters.
- Select Create Email Domain Filter.
- Select the correct Email Relay and ensure Active. Leave the Sender Domain and Recipient Domain as they are (
*). - Save the page.